Basics: Creating Tickets
For this exercise, we're going to assume that you've already set up your event or are familiar with setting up events (if not please see Creating An Event).
You'll be using the Tickets meta box to create the tickets for your event. You'll find it, just below the Events meta box.

We’re going to walk through the creation of a basic ticket and set a capacity for this ticket only (Using a shared capacity for two or more tickets is discussed here).
Start creating your new ticket by clicking on the + New ticket button as shown below.

Once you've clicked, you will be presented with some additional options:

- Type: This is where you'll set the name for the ticket type you're selling (something like Member, VIP, Student, etc.)
- Price: Set's the price of each ticket. If you're giving the tickets away for free, you can leave this field blank or set it to 0.
- Capacity: This is the number of tickets available. If this field is left blank, the system will assume that there is no limit to the number of tickets available. If you have a limited number of seats at your event, be sure to set the capacity accordingly.
PROTIP: If you would rather collect attendee RSVPs, you can click + New RSVP instead (see Creating RSVP's for more information).
After you've set the main settings for you event, you may choose to set more advanced (optional) settings.
Advanced Settings
To access the advanced settings click on the + sign next to the word advanced (just below where you set the ticket capacity)
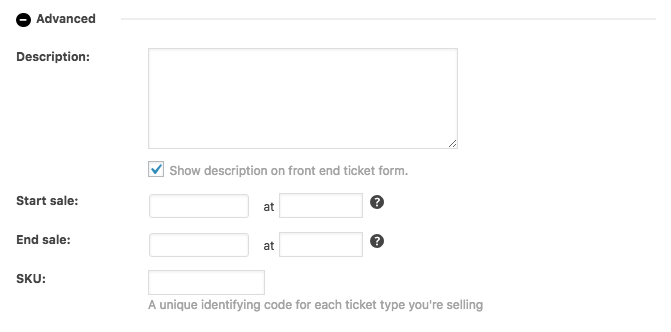
Advanced Settings Explained:
- Ticket description: This section is optional, but it’s a great place to add any relevant ticket information, such as "bring your portfolio", or "includes lunch". You can choose whether or not to show this information in the front end ticket form.
- Start sale: This section allows you to choose when the tickets are available for sale. By default sales will start when you publish the event or ticket -- however, you can use this area to create "early bird" tickets, or to offer staggered ticket sales.
- End sale This does the opposite – you can set this to a date after which the tickets should no longer be available for customers to buy. By default the system will stop sales when the event itself starts.
- SKU lets you set a unique code to help identify the tickets and is not necessary for you to set for your ASMP event.
Attendee Information
By default, the name and contact information of the person buying the tickets is collected during the checkout process.
If you want to collect additional information (such as names of all attendees, meal choices, or other specific information) then you can use the Attendee Information section, located just below the advanced section. This is accessed by by clicking the + sign adjacent to the text "Attendee Information". This article assumes that you do not need to collect additional information. If you would like to learn more about collecting additional information see Collecting attendee information.
Now that you've created your ticket and adjusted your settings you can simply click on Save Ticket. If you need to make any changes to your ticket, click on the pencil shaped icon to edit.

PROTIP: If your event tickets are sold out, the form will still appear -- however the purchasing tickets won’t be possible, and users will see an “Out of Stock!” message.

PROTIP: If tickets are only going to be sold between certain dates and the dates have not yet arrived and users will see a “Tickets are not yet available” message (no sale date will be shown).
